Articles by "Thủ thuật window"

Hiển thị các bài đăng có nhãn Thủ thuật window. Hiển thị tất cả bài đăng


Bước 1:  

Bấm “phím tắt” trên bàn phím “Windows +R” để mở hộp thoại Run.


Nhập %localappdata% nhấn OK. để mở file Explorer và điều hướng đến thư mục AppData\Local

  1. Tìm thư mục “ZaloPC”.
  2. Sao chép thư mục “ZaloPC” (Ctrl+C).
  3. Mở ổ đĩa D muốn lưu trử và dán thư mục “ZaloPC” vào (Ctrl+V).
  4. Xóa thư mục “ZaloPC” khỏi ổ đĩa C.

Bước 2 : 

Mở “CMD” Command Prompt với quyền quản trị: administrator bằng cách tìm kiếm “cmd” trong menu Start, nhấn chuột phải và chọn “Run as administrator”.

  1. Copy code dòng lênh: mklink /D “%localappdata%\ZaloPC” “D:\ZaloPC” và Enter
  2. Thông báo thành công: symbolic link created for C:\Users\Admin\AppData\Local\ZaloPC <<===>> D:\ZaloPC

“Symbolic link created” cho biết rằng liên kết “ZaloPC <<===>> D:\ZaloPC” đã được tạo ra thư mục hoạt động lưu trữ dữ liệu trên ổ đĩa D.

Hãy kiểm tra lại bằng cách mở ZaloPC và đảm bảo rằng nó vẫn hoạt động bình thường và có thể truy cập dữ liệu từ vị trí mới trên ổ đĩa D.

St.


Bản cập nhật KB5006670 gần đây của Windows 10 đang gây ra sự cố in mạng trên nhiều thiết bị. Cho đến khi Microsoft phát hành bản vá chính thức, đây là cách khắc phục.

Download các bạn vá lỗi theo link & update là thành công !

Tải xuống thủ công KB5007253 ( bản vá lỗi khắc phục lỗi máy in )

Đối với fix lỗi 0x0000011b:
  •     Trên máy chủ share máy in, cần copy nội dung bên dưới vào notepad save lại thành 0x0000011b.reg.
[HKEY_LOCAL_MACHINE\System\CurrentControlSet\Control\Print]
"RpcAuthnLevelPrivacyEnabled"=dword:00000000

  • Chạy file vừa tạo, reset máy --> kết nối lại 100% thành công ! 

Chúc các bạn thành công !!!
ST

28 tháng 06 năm 2021, Microsoft đã chính thức đưa ra các yêu cầu cấu hình phần cứng cho hệ điều hành Win11, một trong những yêu cầu về cấu hình phần cứng của nhiều máy tính, đó là TPM 2.0.


Windows-11-reviews.jpg

Theo Microsoft , họ tin rằng chip TPM 2.0 có thể cung cấp khả năng cách ly và mã hóa dựa trên phần cứng, có lợi cho việc kết hợp các tính năng bảo mật của hệ thống Windows 11 giúp ứng phó với các mối đe dọa và bảo vệ thông tin cá nhân.
Bạn có thể tham khảo bài viết dưới đây để tìm hiểu thêm về TPM 2.0

1. regedit

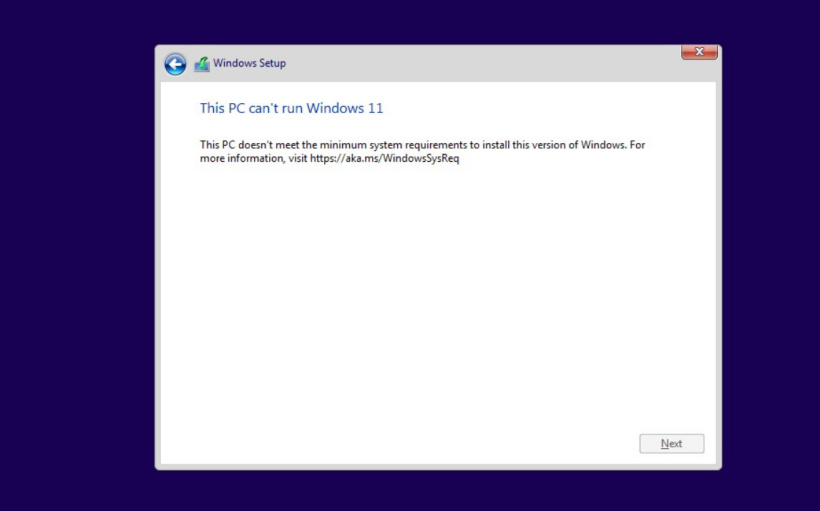
Khi cài đặt Win11 nếu bạn gặp thông báo "Máy tính này không thể chạy Win11". như hình ảnh dưới đây


a53079f3-5834-4142-94e1-9bdb2d7fc0f7.jpg


Hãy khoan thoát, nếu bạn muốn tiếp tục cài đặt Windows 11 hãy nhấn Shift + F10 ngay trên thông báo này để mở giao diện dòng lệnh, nhập regedit mở sổ Registry, sau đó tìm kiếm :

HKEY_LOCAL_MACHINE\SYSTEM\Setup

Tạo một mục có tên "LabConfig", sau đó tạo hai giá trị DWORD trong "LabConfig":

- Khóa "BypassTPMCheck" với giá trị là "00000001"
- Khóa "BypassSecureBootCheck" đặt giá trị là "00000001"

Sau khi lưu và thoát, lỗi thông báo trên biến mất, bạn có thể cài Windows 11 bình thường.

2. Sửa đổi file image ISO và thay đổi ngày :

Trong trường hợp nếu bạn muốn nâng cấp hệ thống bằng cách chạy chương trình setup.exe trực tiếp từ file image ISO Win11 thay vì cài đặt mới, có một giải pháp đơn giản khác.

Bạn cần tìm tệp appraiserres.dll của Win10 ISO , copy và thay thế sang tệp cùng tên của Win11 ISO. Sau khi hoàn tất, bạn cần sử dụng công cụ của bên thứ ba (chẳng hạn như Rufus hoặc AnyBurn) để tạo lại ảnh ISO, sau đó chạy lại file setup để cài đặt Windows 11.

3. Nâng cấp trực tiếp

Phương pháp này có thể nâng cấp trực tiếp , bạn cần bật Secure Boot, sau đó định dạng đĩa sang định dạng GPT, cài đặt Win10, sau đó sử dụng Win11 ISO để nâng cấp và cài đặt.

4. Cài đặt không cần TPM 2.0 và Secure Boot trên ‘Legacy BIOS Mode

Đây là cách cài đặt Windows 11 trên BIOS cũ. Bạn có thể áp dụng các 
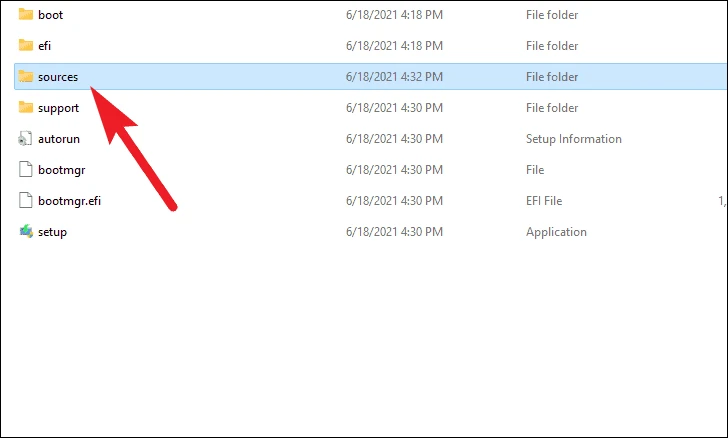
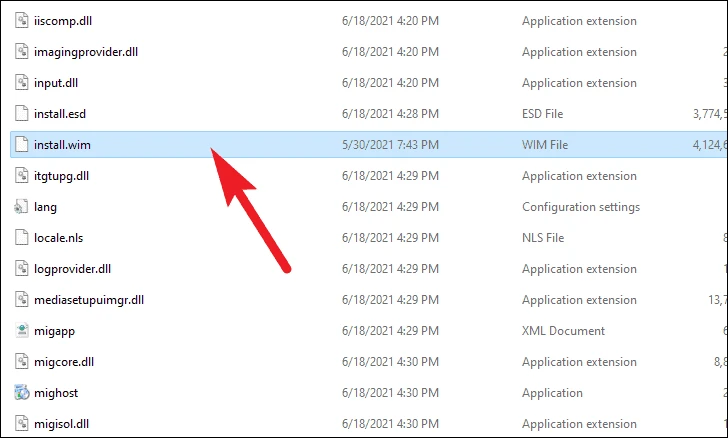
phương pháp bên trên Về cơ bản, bạn cần tạo một ổ USB Windows 10 có thể khởi động và sau đó thay thế tệp install.wim trong thư mục ‘sources’ của USB boot Windows 10 bằng tệp install.wim từ file imgae ISO Windows 11.


allthings.how-how-to-install-windows-11-on-legacy-bios-without-secure-boot-and-tpm-navigate-sources-1.webp

allthings.how-how-to-install-windows-11-on-legacy-bios-without-secure-boot-and-tpm-install-wim.webp


Dán tệp install.wim bạn đã sao chép từ file image ISO của Windows 11 vào thư mục ‘source’ ổ USB Windows 10 boot . Nhớ chọn Replace the file in the destination để ghi đè.

Những cách trên đây được thử nghiệm thành công đối với phiên bản rò rỉ Windows 11 dev vào ngày 15 tháng 06.

Link tải ISO win 11: google drive , OneDrive, Mediafire

Vn-Z.vn team tổng hợp

Chức năng Live Search trên win 10 đã thay đổi cách hoạt động vào tháng 12 năm 2019. Trước đó, bạn có thể tìm kiếm bằng File Explorer và trên thanh tìm kiếm khi gõ vài kí tự kết quả sẽ được xuất hiện mà không cần phải nhấn Enter hay Nút Tìm Kiếm.


Một lỗi nhỏ khá bất tiện , nhưng đã có cách để khôi phục. Theo hướng dẫn của 1 thành viên trên diễn đàn Majorgeeks, chúng ta có thể khắc phục theo các bước bên dưới:

  1. Start - run -> Gõ regedit để xuất hiện bảng Registry Editor.
  2. Tìm đến khóa " HKEY_LOCAL_MACHINE\SOFTWARE\Microsoft\Windows\CurrentVersion\Policies\System"
  3. Chọn key  "ConsentPromptBehaviorAdmin" value , double click set data về 0 (zero).
  4. Tiếp tục đến key "EnableLUA" double click set the data về 0 (zero). Nếu chưa có key "EnableLUA", chúng ta cần tạo key DWORD (32-bit).
  5. Khởi động lại máy là xem kết quả.
Chúc các bạn thành công !!!


  • Nhấn tổ hợp phím Windows + R.
  • Gõ regedit và nhấn Enter.
  • Truy cập đến key:
HKEY_LOCAL_MACHINE\System\CurrentControlSet\Control\Terminal Server\WinStations\RDP-Tcp\
  • Double click vào value PortNumber > click vào Decimal > nhập vào số port cần thay đổi > OK.
  • Thiết lập firewall accept port mới thay đổi.
  • Thoát Registry Editor và restart server.


Vấn đề lỗi license autocad 2017 - 2019 : The License manager is not functioning or is improperly installed trong AutoCAD.

Bước 1: Kiểm tra trạng thái FlexNet Licensing Service
 --> Start - run - services.msc --> Check FlexNet Licensing 64 --> Running.

Đóng cửa sổ & Mở lại Autocad xem còn lỗi hay ko ? Vẫn còn tiếp tục đến bước 2

Bước 2 : Tạo lại license data file

AutoCAD của chúng ta sẽ không mở được nếu licensing data file  bị mất hoặc bị lỗi.
1. Di chuyển đến thư mục sau:
    • Đối với AutoCAD 2017: C:\ProgramData\Autodesk\CLM\LGS\<Product_Key>_2017.0.0.F
    • Đối với AutoCAD 2018: C:\ProgramData\Autodesk\CLM\LGS\<Product_Key>_2018.0.0.F
    • Nếu thư mục không có, chúng ta phải cho phép hiện folder đó lên
    • Nếu thư mục không tồn tại, chúng ta phải tạo folder đó.
2. Tìm file LGS.data có sẵn trong folder, chúng ta hãy xóa nó.
3. Sử dụng một trình soạn thảo văn bản (như Notepad) để tạo file LGS.data trong folder.
4.Mở file LGS.data và nhập:
    • _STANDALONE (nếu sản phẩm có serial number)
    • _NETWORK
    • _USER (nếu license dựa vào Autodesk ID và không có serial number)

5. Lưu file LGS.data và đóng lại. --> mở Autocad xem ok chưa ? vẫn chưa thì đến bước cuối cùng. ( bước 3). 

Bước 3 : Active lại license thay vì phải cài lại
  • Tìm đến thư mục C:\Users\<username>\AppData\Roaming\Autodesk\ADUT và remove tất cả file.
  • Đến thư mục C:\Users\<username>\AppData\Local\Autodesk\WebService và remove file LoginState.xml
  • Đến thư mục C:\ProgramData\FLEXnet, nếu folder này tốn tại thì remove tất cả file có tên adskflex.
  • Khởi động AutoCAD và kích hoạt license.

Chúc các bạn thành công !


This registry fix may get Defender working . . .

Click your Start Button, type regedit and hit Enter to open the Registry Editor

In the left pane, navigate to:
HKEY_LOCAL_MACHINE\SYSTEM\CurrentControlSet\Services\SecurityHealthService

In the right hand pane, double click Start

Set its value to 2

In the left pane, navigate to:

HKEY_LOCAL_MACHINE\SOFTWARE\Policies\Microsoft\Windows Defender

In the right hand pane, if DisableAntiSpyware and DisableAntiVirus exist, double click both DisableAntiSpyware and DisableAntiVirus

Set their values to 0

If DisableAntiSpyware and DisableAntiVirus do not exist, right click an empty space on the right hand pane and choose New - DWORD (32-bit) Value and name them appropriately

Set their values to 0

Clikc OK and close the Registry Editor

Restart your PC         


Hướng dẫn:

  1. Chạy CMD với quyền Administrator
  2. Xác định window 32 hay 64, theo đúng đường dẫn bên dưới : 
    • C:\Windows\Microsoft.NET\Framework\v4.0.30319
    • c:\Windows\Microsoft.NET\Framework64\v4.0.30319\
  3. Gõ lệnh thực thi như sau : 
    • ngen.exe executequeueditems
Đợi chạy lệnh thành công & kiểm tra kết quả.

Sưu tầm


Sửa lỗi 

Error 1920. Service ‘Office Software Protection Platform’ (osppsvc) failed to start. Verify that you have sufficient privileges to start system services.
-or-
Error 1920 service failed to start. Verify that you have sufficient privileges to start system services
-or-
Office 2013 Error 1920. Service Windows Font Cache Service (FontCache) failed to start


HƯỚNG  DẪN

  Bước 1 :  Phân quyền cho NETWORK SERVICE
In Windows Explorer:
Right Click  on the folder OfficeSoftwareProtection Platform from C:\Program Files\Common Files\Microsoft Shared and Microsoft from C:Program data(hidden folder) Properties > Security > Edit > Add > Type Network Service > OK > Check the Full control box > Apply and OK.
In Registry Editor (regedit.exe):
Go to HKEY_CLASSES_ROOT\AppID registry >Right Click on the folder > Permissions > Add > TypeNETWORK SERVICE >  OK > Check Full Control > Apply > OK
BƯỚC 2 : Kiểm tra trong folder OfficeSoftwareProtection Platform đã  có  các file :


Nếu chưa có cần chép các file vào thư mục  này, có thể download & giải nén tại đây : Link

BƯỚC 3 : Chạy câu lệnh gán quyền cho các file
 icacls "C:\Program Files\Common Files\Microsoft Shared\OfficeSoftwareProtectionPlatform" /grant "Network Service:F" /t
BƯỚC 4 :  Cài lại office sẽ báo thành công.

P/S : trong trường hợp thất bại, cần tạo lại user admin khác, thực hiện lại các thao tác từ bước 2.

Sửa lỗi CSC Cache trên Win7,8,10

Vì 1 lí do nào đó, các ổ map network không còn hiện dữ liệu đúng như mong muốn,. Lúc này có thể do cơ chế cache bị lỗi, chúng ta phải reset nó để có thể hoạt động bình thường, nào bắt đầu thôi !

  1. Turn off offline files
    • Type “Offline” in the search box in the upper right hand corner.
    • Select “Manage Offline Files”
    • Select “Disable Offline Files”
    • Reboot
  2. Delete CSC Cache Using Robocopy
    • Start a Command Prompt with Administrative privileges byt clicking the Start Button and typing CMD. When the Command Prompt program appears in the search results, Right Click it and select “Run as Administrator.”
    • Type “cd \”
    • Type “mkdir erasescsc”
    • Type “robocopy c:\erasecsc c:\windows\csc\v2.0.6\cache /mir”. This basically writes over the CSC directory with the blank one you just created. Unlike Windows Explorer, Robocopy works around the permission and ownership issues as long as it is run as an administrator.
  3. Make Registry Entry for Resetting CSC Cache
    • This step should be done by advanced users only, as editing the registry can make your computer into an expensive paperweight if not done correctly. For those users, and for the brave, do the following.
    • Type “regedt32” in the Command Prompt window. This will open the registry editor.
    • Browse to HKEY_LOCAL_MACHINE\SYSTEM\CurrentControlSet\Services\Csc
    • Most likely there will be a folder called “Parameters” already in that section. If not, add a new key (folder) called Parameters by right clicking on CSC and selecting “New” and then Key”.
    • Under HKEY_LOCAL_MACHINE\SYSTEM\CurrentControlSet\Services\Csc\Parameters, right click and add a new DWORD called FormatDatabase and set its value to 1.
    • Close the editor and reboot
  4. Re-Enable Offline Files
    • Type “Offline” in the search box in the upper right hand corner.
    • Select “Manage Offline Files”
    • Select “Enable Offline Files”
    • Close and Reboot

Những lỗi có thể áp dụng sửa bằng Command Prompt trên WinMini :
  1. Lỗi màn hình đen BOOTMGR is missing, Press Ctrl + Alt + Del to restart
  2. Lỗi Recovery hay Boot Manager với thông tin file BCD, Winload.efi, Winload.exe
  3. Lỗi màn hình đen với thông báo Device Not Found

Hướng dẫn : ( Chỉ với 5 dòng lệnh)

lệnh : diskpart
Chọn ổ đĩa cài window bị lỗi: lệnh C:
lệnh : bootrec /fixboot
lệnh : bootrec /fixmbr
lệnh : bootrec /rebuildbcd --> Y để kết thúc quá trình sửa lỗi.


Vì lý do nào đó khi remote desktop bị lỗi như hình bên dưới, chúng ta chỉ cần thêm khóa registry như bên dưới là mọi chuyện được giải quyết !


Hướng dẫn thực hiện :

Windows Registry Editor Version 5.00
[HKEY_LOCAL_MACHINE\SOFTWARE\Microsoft\Windows\CurrentVersion\Policies\System\CredSSP]
[HKEY_LOCAL_MACHINE\SOFTWARE\Microsoft\Windows\CurrentVersion\Policies\System\CredSSP\Parameters]
"AllowEncryptionOracle"=dword:00000002


Profiles Outlook


Outlook 2010 and older, profiles are stored in the registry at HKEY_CURRENT_USER\​Software\​Microsoft\​Windows NT\​CurrentVersion\​Windows Messaging Subsystem\​Profiles

Outlook 2013 the profile moves to the HKEY_CURRENT_USER\​Software\​Microsoft\​Office\​15.0\​Outlook\​Profiles key.

Outlook 2016  HKEY_CURRENT_USER\​Software\​Microsoft\​Office\​16.0\​Outlook\​Profiles


HKEY_CURRENT_USER\​Software\​Policies\​Microsoft\​office\​14.0\​outlook - This key will only exist if you have certain policies enabled. Most home users will not have settings here. It's safe to use on other computers. Don't forget to change the version number if you aren't using Outlook 2010.


Outlook 2016: 16.0

HKEY_CURRENT_USER\​Software\​Microsoft\​Office\​16.0\​Outlook
Outlook 2013: 15.0
HKEY_CURRENT_USER\​Software\​Microsoft\​Office\​15.0\​Outlook
Outlook 2007: 12.0
HKEY_CURRENT_USER\​Software\​Microsoft\​Office\​12.0\​Outlook
Outlook 2003: 11.0
HKEY_CURRENT_USER\​Software\​Microsoft\​Office\​11.0\​Outlook
Outlook 2002: 10.0
HKEY_CURRENT_USER\​Software\​Microsoft\​Office\​10.0\​Outlook


You can use a simple batch file to export your registry keys. You can run the task scheduler using an Outlook macro or set it up in Task Scheduler. Paste the following line into a new NotePad file (change the version number if necessary) and save it with the extension .bat. Double click on the file to Run.


REG EXPORT "HKEY_CURRENT_USER\​Software\​Microsoft\​Office\​15.0\​Outlook" "C:\​Users\​Diane\​My Box Files\​Outlook-options.reg" /y

Tool nhỏ diệt virus trên window, lưu đoạn code thành file quetvirus.bat (run as Admin)
sc config WindowsMap_Help start= disabled
net stop WindowsMap_Help /Y
sc config UsoSvc start= disabled
net stop UsoSvc /Y
sc config wuauserv start= disabled
net stop wuauserv /Y
sc config WindowsMap_Help start= disabled
net stop WindowsMap_Help /Y
del /q c:\Windows\System32\ProximityUntilCache32.tlb.0*
del /q "C:\Users\%username%\Desktop\Windows 10 Update Assistant.lnk"
taskkill /IM firefox.exe /F
taskkill /IM lsasost.exe /F
taskkill /IM win1ogins.exe /F
taskkill /IM Bluek.exe /F
taskkill /IM mssecsvc.exe /F
taskkill /IM MyBu.exe /F
taskkill /IM Mzol.exe /F
rem taskkill /IM sihost.exe /F
taskkill /IM SystemSettingsBroker.exe /F
taskkill /IM taskhostw.exe /F
taskkill /IM TabTip.exe /F
taskkill /IM TabTip32.exe /F
taskkill /IM CLMLSvc_P2G8.exe /F
taskkill /IM remsh.exe /F
taskkill /IM taskhostw.exe /F
@echo ===Empty Firefox============
mkdir "C:\Program Files (x86)\Mozilla Firefox\TMP"
copy "C:\Program Files (x86)\Mozilla Firefox\firefox.exe" "C:\Program Files (x86)\Mozilla Firefox\TMP\Firefox.tmp"
copy "C:\Program Files (x86)\Mozilla Firefox\plugin*.exe" "C:\Program Files (x86)\Mozilla Firefox\TMP\plugin*.tmp"
del /q "C:\Program Files (x86)\Mozilla Firefox\*.exe"
copy "C:\Program Files (x86)\Mozilla Firefox\TMP\*.tmp" "C:\Program Files (x86)\Mozilla Firefox\*.exe"
@echo ===End empty Firefox============
@echo "Disable NTFS tren C:\Windows\Fonts"
@echo ======================================================
@echo ===
@echo ::::: CHU Y: Kiem tra xem ben tren co dong Successfully nao khong. Co la co virus va da duoc diet xong boi Cmd nay"
@echo ...:: Written by NGUYEN VAN HUU QUYNH::...
@echo ===
@echo ======================================================
@pause
St

Author Name

y

Biểu mẫu liên hệ

Tên

Email *

Thông báo *

Thiên Kim Blog. Được tạo bởi Blogger.